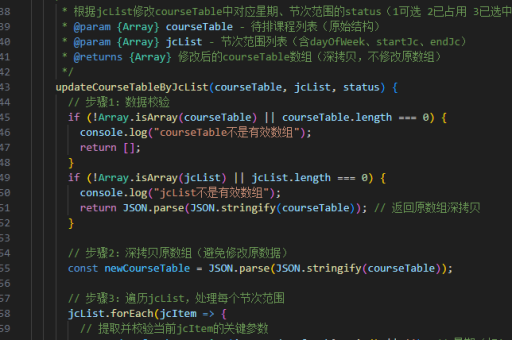
vue实现前进刷新
Vue 实现前进刷新功能
在 Vue 中实现前进刷新功能,通常需要监听路由变化并控制页面刷新逻辑。以下是几种常见的实现方式:
监听路由变化
利用 Vue Router 的导航守卫或 watch 监听路由变化,在前进时触发刷新逻辑:
// 在组件或全局路由中
watch: {
  '$route'(to, from) {
    if (to.meta.isForward && !from.meta.isForward) {
      window.location.reload();
    }
  }
}
需在路由配置中标记前进的页面:
{
  path: '/target',
  component: TargetComponent,
  meta: { isForward: true }
}
使用 keep-alive 动态控制缓存
结合 keep-alive 和路由元信息动态决定是否缓存组件:

<template>
  <keep-alive :include="cachedViews">
    <router-view></router-view>
  </keep-alive>
</template>

<script>
export default {
  computed: {
    cachedViews() {
      return this.$store.state.tagsView.cachedViews;
    }
  }
};
</script>
在路由跳转时通过 beforeRouteLeave 或全局守卫更新缓存列表。
强制刷新当前路由
通过重新加载当前路由实现伪刷新效果:

this.$router.replace({
  path: '/redirect' + this.$route.fullPath
});
需配置一个 /redirect 路由指向空组件,并在其 beforeEnter 中跳回原页面。
利用 window.history 和 key
为路由组件绑定唯一 key,利用 window.history.state 控制刷新:
<router-view :key="$route.fullPath + historyKey"/>在前进操作时更新 historyKey:
goForward() {
  this.historyKey = Date.now();
  this.$router.push('/target');
}
注意事项
- 直接调用
window.location.reload()会丢失 Vue 状态,优先考虑组件级刷新。 - 对于需要保留数据的场景,建议结合 Vuex 或本地存储。
- 移动端需注意浏览器默认前进/后退行为可能与预期不同。
以上方法可根据具体场景组合使用,例如监听路由 + 动态 key 是较常见的实践。